In this post I’ll describe how to host a static website within an Azure Storage Account, a custom domain and secure it with HTTPS.
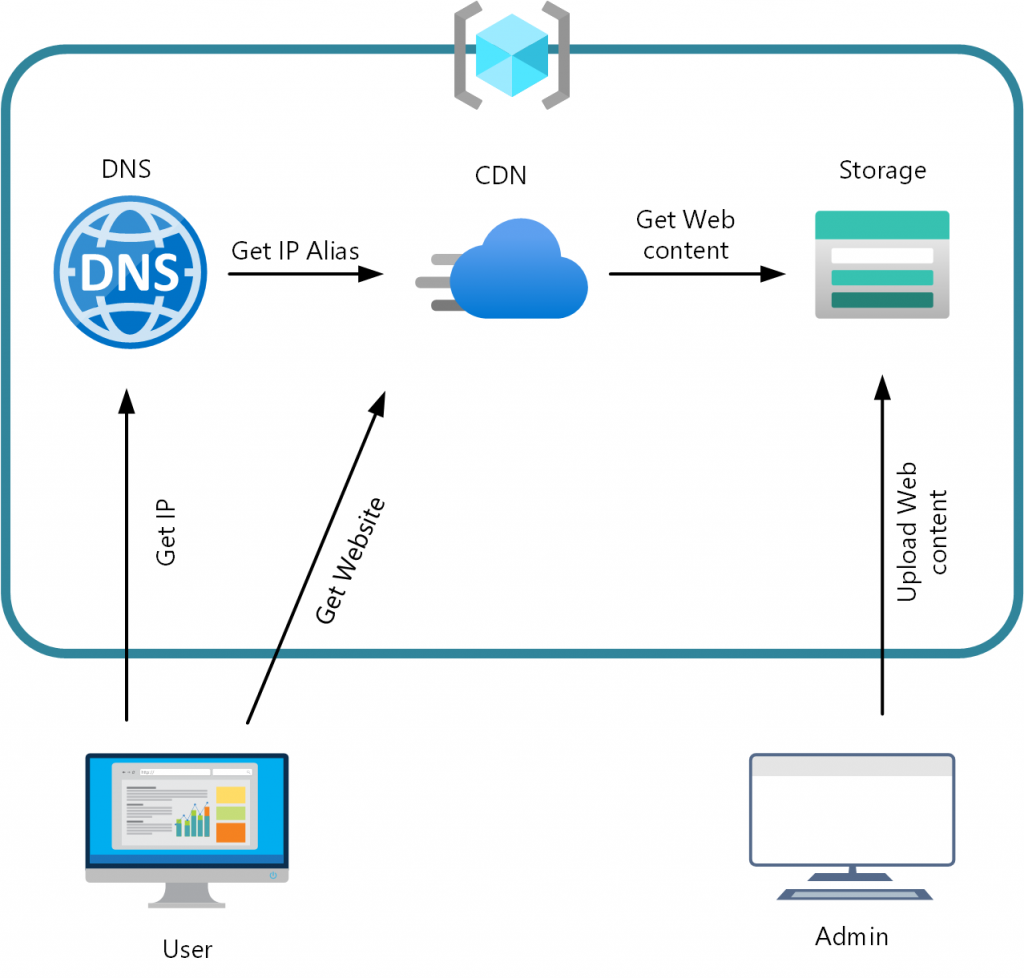
Hosting a static website in an Azure Storage Account is as easy as turning the feature on and upload some files. But adding a custom domain and HTTPS to it requires some effort. First let’s see how I ended up:
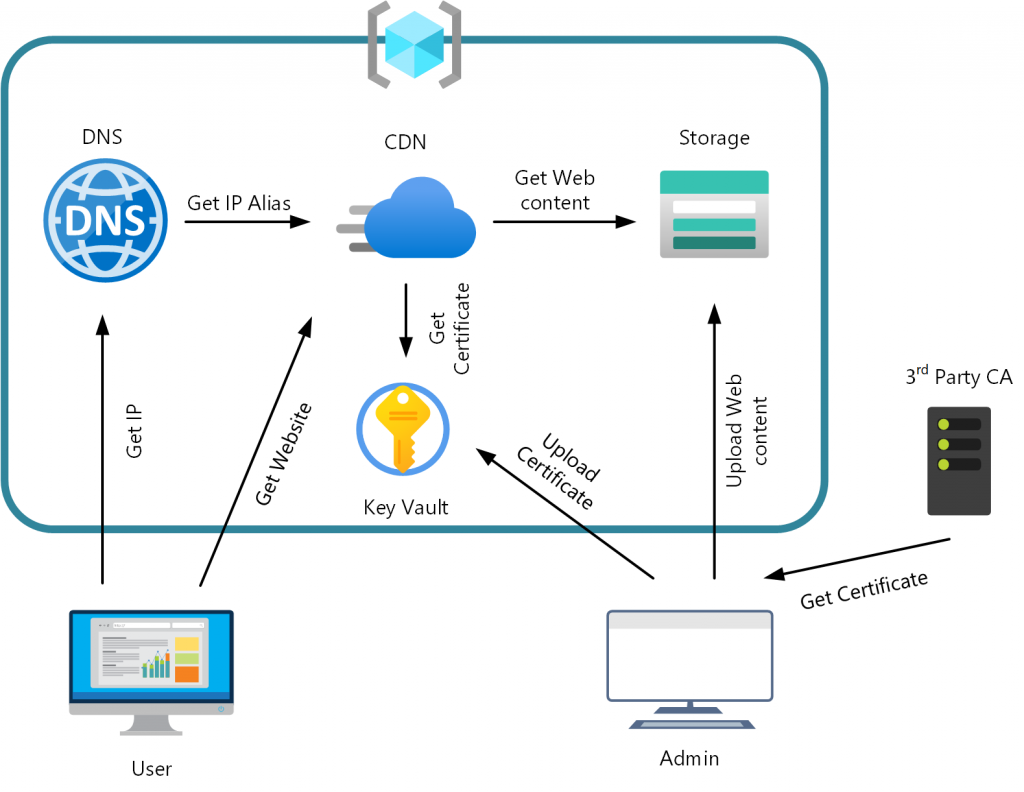
That looks quite oversized or not? So why do we need all that stuff? Let’s start simple:
Hosting a static Website
First, we create a Resource Group and an Azure Storage Account. I’ll use the Azure Cloud Shell as that’s the easy part:
New-AzResourceGroup -Name StaticSite `
                    -Location WestUS
New-AzStorageAccount -Name robinsstaticsitedemo `
                     -ResourceGroupName StaticSite `
                     -SkuName Standard_LRS `
                     -Location WestUS
That’s a simple, empty Storage Account in WestUS. To be able to host the static site, we need to enable that Feature, which can be done using the Azure Portal. Just select the Storage Account and go to Settings -> Static website:
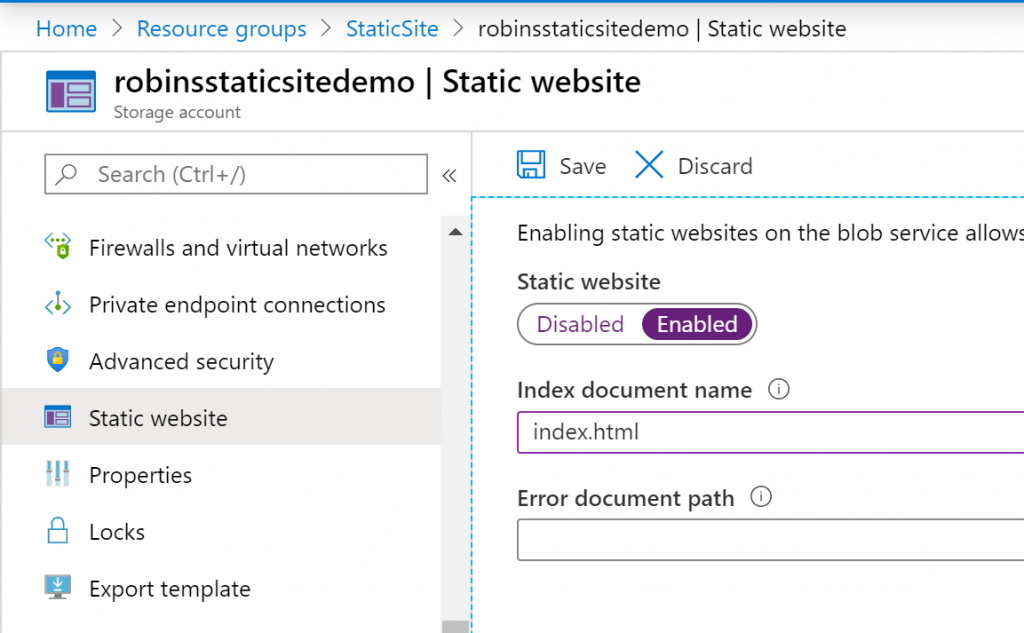
Select Enable and which document should be the index and what should be served in case of an error (Like the requested page is does not exist). After you click save there will be a new container named $web in your Storage Account which is the root of your static site. Also note that after you save there will be the URL where your site will be accessible, in my case https://robinsstaticsitedemo.z22.web.core.windows.net/
Time to upload some data. That can be done directly through the Azure Portal using the integrated Storage Explorer by your local installed Storage Explorer. I uploaded a simple Hello world index.html:
<!DOCTYPE html>
<html>
  <head>
    <meta charset="utf-8" />
    <title>Hello World</title>
  </head>
  <body>
    <p>Hello World</p>
  </body>
</html>
That’s the first part. Now you have a static site, accessible through the Azure provided URL, already secured with HTTPS.
Adding a custom domain name
You my already noticed that the URL is not quite nice. It’s ok to host some static assets which is embedded in other websites but not very nice as an entry point for a user. Let’s add a custom domain. For this to work we need to create a CNAME record to the storage account. Using Azure DNS it looks like this:
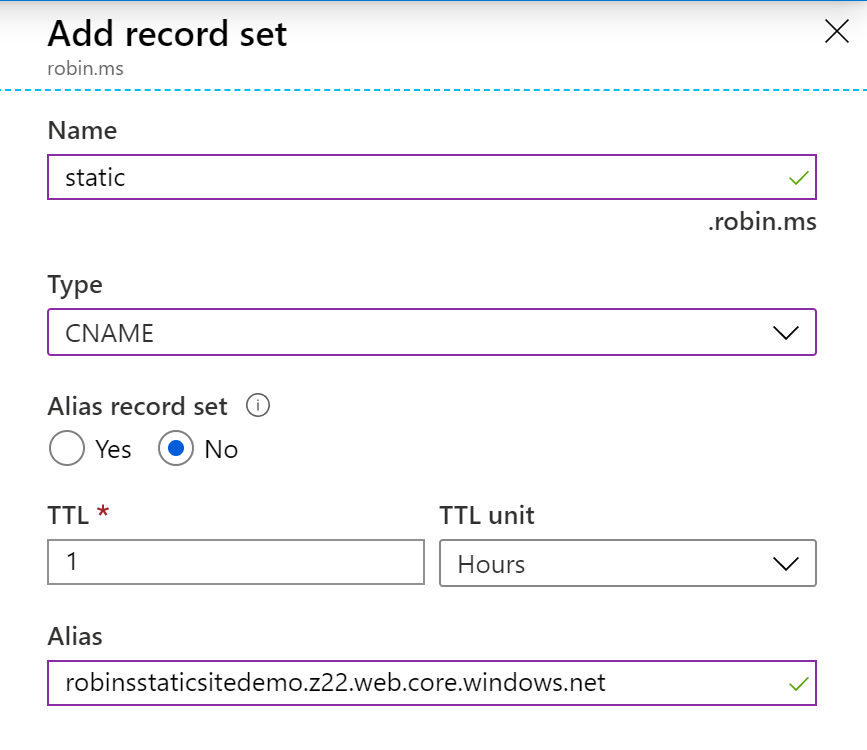
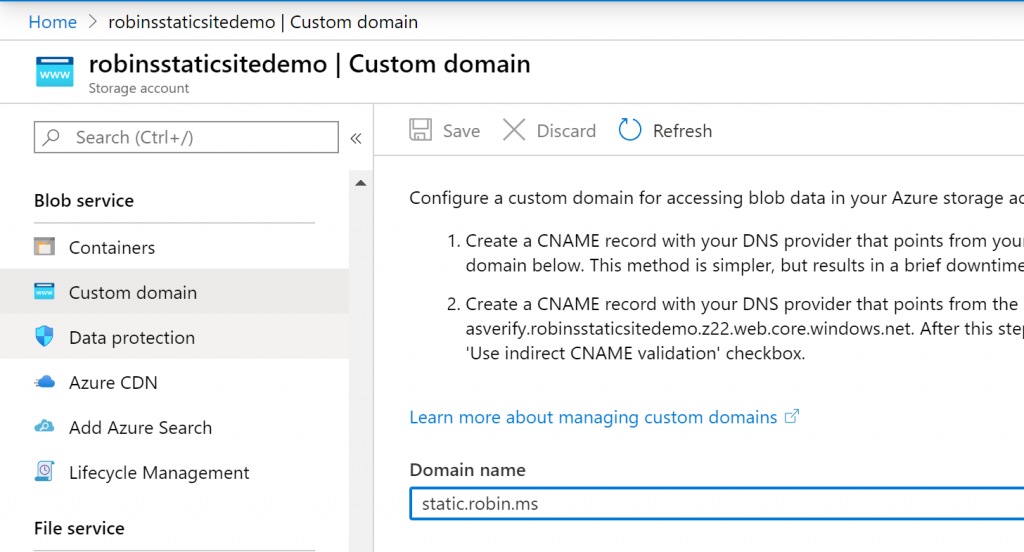
After adding the CNAME record to your DNS we can add the domain using the Cloud Shell or the Portal
Set-AzStorageAccount -Name robinsstaticsitedemo -ResourceGroupName StaticSite -CustomDomainName static.robin.ms
Looks good! But after a quick test we’ll get the following error: The account being accessed does not support http. That’s because Secure transfer required is enabled by default when you create a Storage Account. If we try using HTTPS we get certificate error as the static website feature does not support the using HTTPS and a custom domain. Which is of course documented:
To enable HTTPS, you’ll have to use Azure CDN because Azure Storage does not yet natively support HTTPS with custom domains.
Adding HTTPS to our custom domain
Let’s add an Azure CDN Profile to get HTTPS.
New-AzCdnProfile -ProfileName static `
                 -ResourceGroupName StaticSite `
                 -Sku Standard_Microsoft
                 -Location WestUS
New-AzCdnEndpoint -EndpointName robinsstatic `
                  -ProfileName static `
                  -ResourceGroupName StaticSite `
                  -OriginName robinsstaticsitedemo-z22-web-core-windows-net `
                  -OriginHostName robinsstaticsitedemo.z22.web.core.windows.net `
                  -OriginHostHeader robinsstaticsitedemo.z22.web.core.windows.net `
                  -Location WestUS
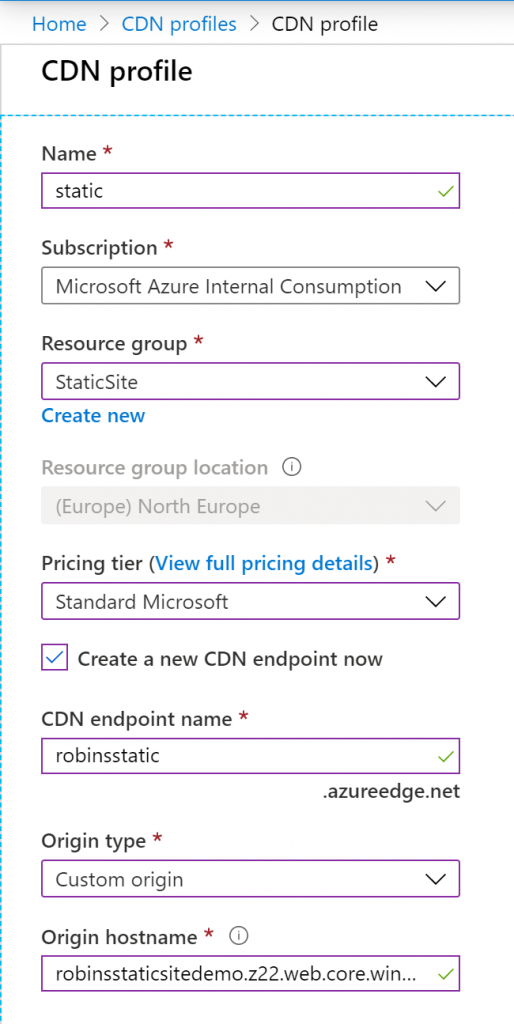
Now we can access our site through the CDN using HTTPS https://robinsstatic.azureedge.net/. But that’s not our domain, so let’s change this.
We need to add the custom domain to our CDN. For this we need to change our CNAME again. This time it needs to point to our Azure CDN endpoint. As I’m using Azure DNS, I can create an Alias record.
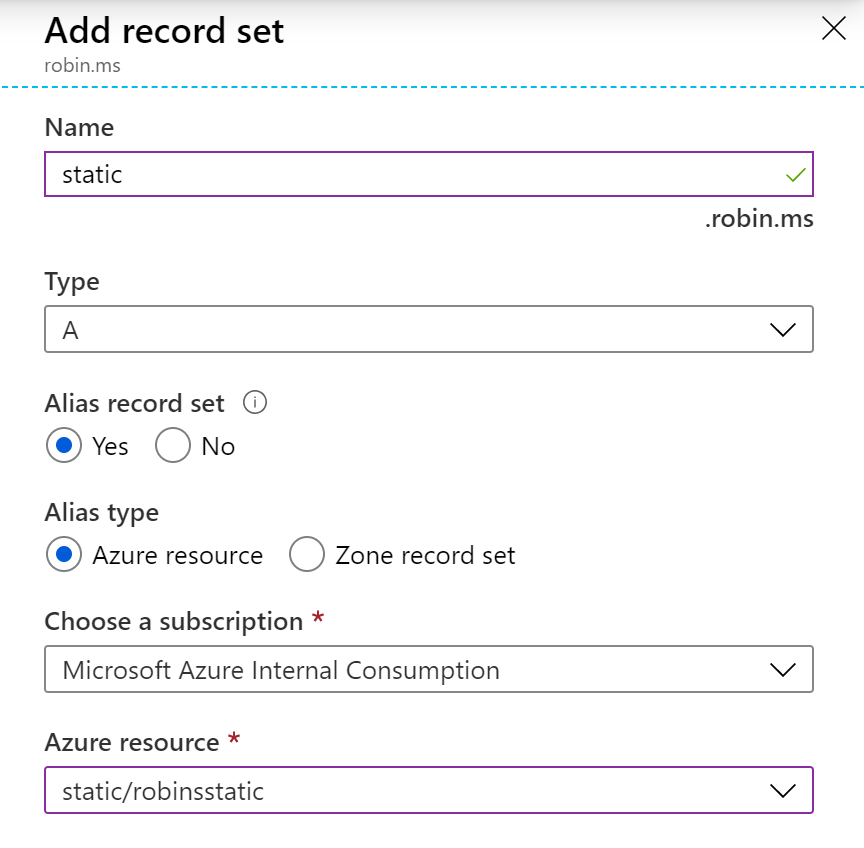
The alias record let’s Azure DNS return the IPs directly instead of the CNAME which only returns where to look next.
After we changed the DNS records, we can add the domain to the CDN Endpoint through Settings -> Custom domains -> Add. By default, after adding your domain HTTPS isn’t enabled. Let’s select your custom domain and enable HTTPS:
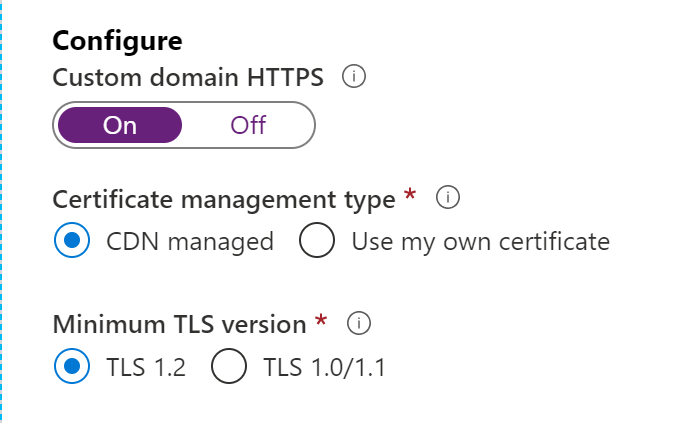
If you are not trying to add a sub domain but an apex domain, i.e. the second level domain robin.ms then you can’t use the CDN managed certificate and need to provide your own, which is covered in the next section. For now, let’s continue with our subdomain and click save. It will take a while until the certificate is generated and deployed to all CDN POP locations.
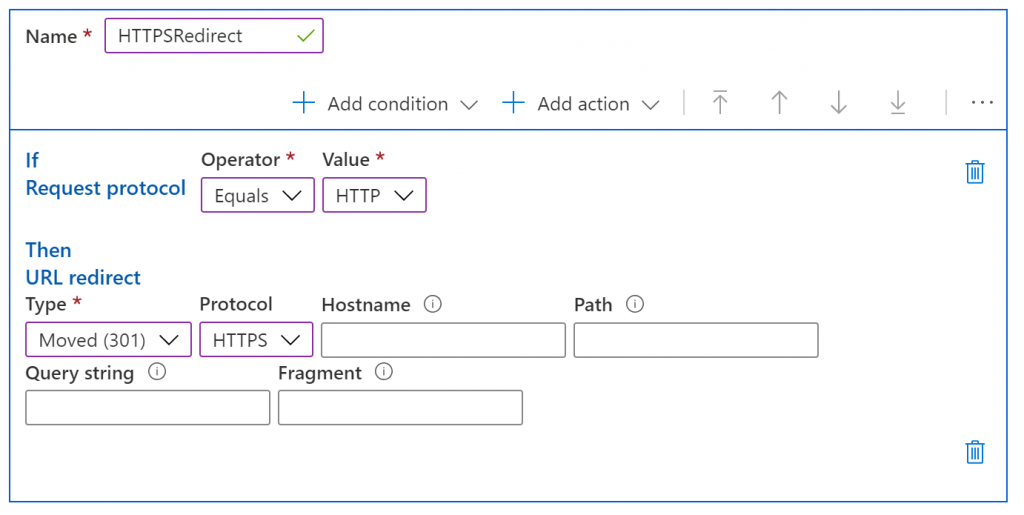
Until this has finished let’s create a redirect from HTTP to HTTPS as the Storage Account is configured to only allow encrypted connections. This is easily possible with the Rules engine which is included in the “Azure CDN Standard from Microsoft” pricing tier. In the CDN Endpoint select Settings -> Rules engine -> Add rule:
That’s it. We now have a static site served from an Azure Storage Account through the Azure CDN and secured with HTTPS and accessible with our custom Domain:
Additional work for apex domains
As the apex domains can’t have CDN managed certificates we need to provide our own certificate. For this we need an Azure Key Vault which stores the certificate. Let’s create the Key Vault. We’re doing that via PowerShell as it’s also required to enable the Azure CDN Security Principal. This principal is used to receive the certificate from the vault.
New-AzKeyVault -Name staticvault `
               -ResourceGroupName StaticSite `
               -Location WestUS `
               -Sku Standard
New-AzADServicePrincipal -ApplicationId "205478c0-bd83-4e1b-a9d6-db63a3e1e1c8"
After the Key Vault is created, we need to give permissions to upload the certificate and to the service principal to receive the certificate.
Set-AzKeyVaultAccessPolicy -VaultName staticvault `
                           -ResourceGroupName StaticSite `
                           -UserPrincipalName $adminuser `
                           -PermissionsToCertificates create,import,list,update,get `
                           -PermissionsToSecrets get, list
Set-AzKeyVaultAccessPolicy -VaultName staticvault `
                           -ResourceGroupName StaticSite `
                           -ServicePrincipalName 205478c0-bd83-4e1b-a9d6-db63a3e1e1c8 `
                           -PermissionsToCertificates get `
                           -PermissionsToSecrets get
Now it’s time to upload the certificate. You can upload an existing certificate with its private key or you can create a certificate request directly with the Key Vault so that the private key never leaves the Azure environment. As we want to go the most secure way, we’ll chose option two and create an CSR through the portal.
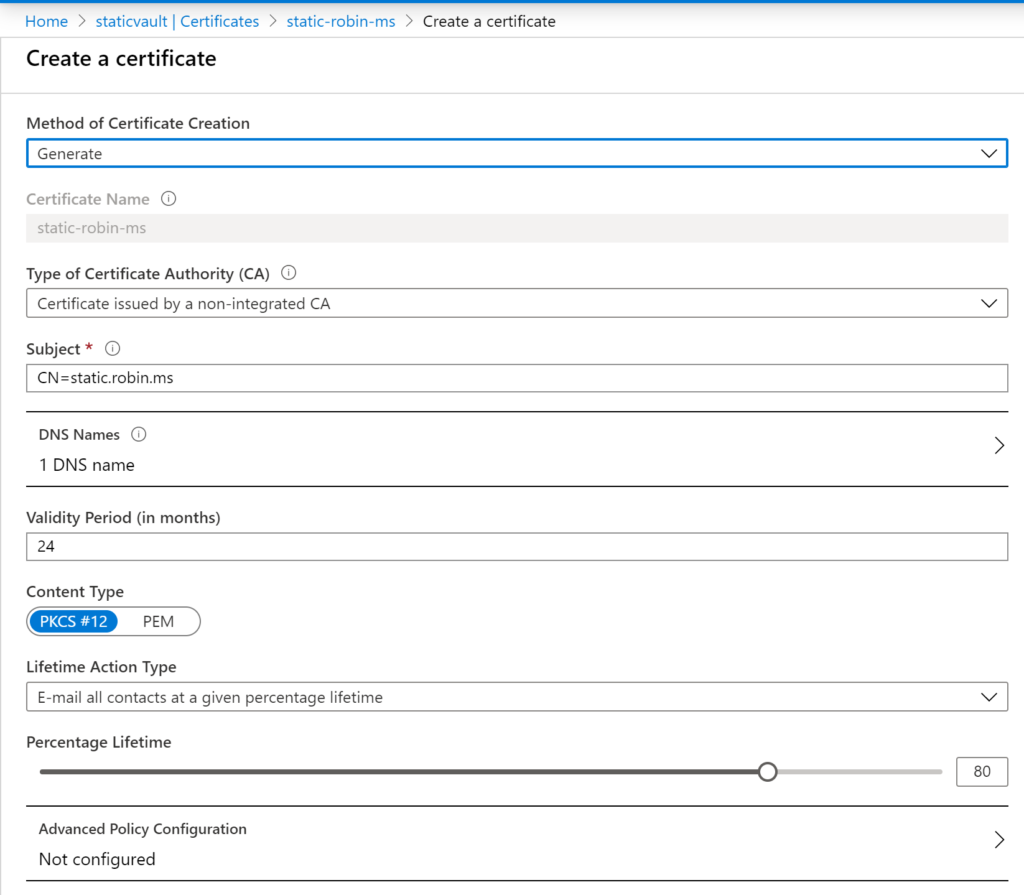
It’s important to put the domain in the DNS Names option. You may want to change the advanced options, but we leave it with the defaults.
We now see the Certificate in Disabled state. We need to download the CSR by clicking selecting the certificate and then on Certificate Operation. Now you can download the CSR ang get it signed by any Certificate Authority.
When you get back the certificate, you dan upload it by selecting Merge Signed Request in the Certificate Operation blade.
Now it’s time to go back to our CDN Profile -> Endpoint -> Custom domain. Enable HTTPS and select Use my own certificate. Finally, you can select the Key Vault, Certificate and the Certificate Version.
That’s it now you have a static website under your apex domain with forced HTTPS.
Conclusion
I wanted to create a static website just with a few links to my social media / GitHub profiles. It was much more work than I expected but I was forced to get to know and use a few more services provided by Azure. It always makes a lot more fun when you have an actual problem to solve like this to get into new things.
So, that’s my first Post in this Blog. Maybe there will be more ‘notes’, maybe this will be another project which I should pay more attention to. If you are interested in other Azure or Microsoft related topics feel free to reach out.